
If you select a thumbnail in gThumb, or the full photo is shown, you can send it to the Gimp by pressing the G button. With some minor adjustments you can also send photos to the raw processors Darktable and RawTherapee, or use the dcraw terminal program to convert them in the background. Since version 2.10, Gimp accepts 16-bits files as well, so we can use this program and/or the gmic plugin to further process the converted raw files.
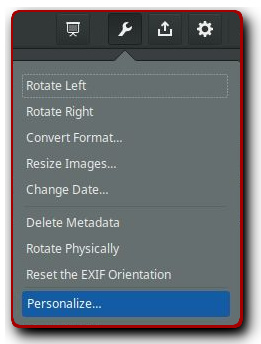
Click on the tool icon in the top menu bar and choose Personalize. In the Commands window that appears, click on New. Give it a name: Darktable (D). As command you simply specify 'darktable', with a '%U' behind it. By clicking on the icon on the right-hand side of that line, you will see a number of further options. The command "darktable %U" simply says: send the current file to Darktable. Now select a shortcut by clicking on that field and enter 'D'. Uncheck 'Terminal command' and save this command.
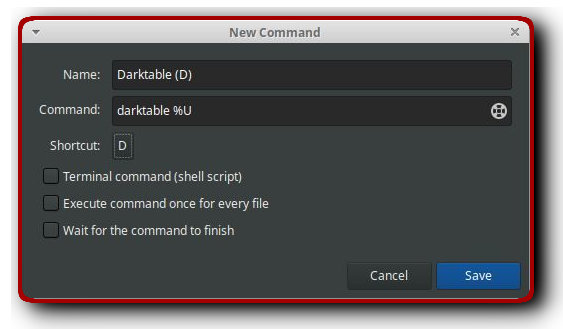
Close the first command window and you will return to gThumb. Choose a raw file and type D and voilà, the photo will open in Darktable - assuming this application is installed of course!
Of course it is no problem to send non-raw files to Darktable as well.
Similarly, we can add RawTherapee to our launch platform, with the difference that - on my system - the '%U' from above must be replaced by a '%F' - for an unknown reason. To run RawTherapee, I use a so-called AppImage. An AppImage applies the principle of 'one app is one file'. It is therefore one single file in which RawTherapee plus all required libraries are packaged. You can upgrade to a newer version by downloading the latest AppImage (you won't receive notifications of a new version). Very practical, those things! RawTherapee's AppImage can be found on this page. You'll find there versions for the Macintosh and Windows as well.
An AppImage must be made executable before you can start them. You can do this like so. Right-click on the file name with the mouse and then choose Properties. Under the tab Permissions you indicate that this program may be executed.
This AppImage resides in my Downloads folder and my command is:
Downloads/RawTherapee-releases-5.6-20190420.AppImage %F
You can put that AppImage anywhere. You can also use the slightly older, regular version that is available in your Software Manager.
As a shortcut I choose Alt+R (because the R is already used within gThumb for the rotate command). Here too, uncheck the Terminal order option and save the command.
Now you can send a raw file from within gThumb to RawTherapee by selecting a thumbnail or opening the photo and hitting Alt+R. You can also send non-raw files to this image processor for further processing.
[Remark. Since version 2.10.8 or thereabout, the following trick does not work anymore. In order to work on raws in Gimp, you first have to make a (preferably) 16-bit tiff file with one of the available raw convertors.]
Starting with version 2.10, Gimp can also process 16-bit files, so we can send 12- or 14-bit raw files to it. Of course these raws must first be converted by a raw program. It works just like the ufraw plugin did for Gimp 2.8 and earlier: you clicked on a raw, then ufraw opened, you made your raw adjustments, and after closing the program, the converted raw was sent to Gimp - but as a 8-bit file. With version 2.10 this has changed and you can use the full bit depth of your raw files now. In Gimp, under Preferences, you have to indicate which program you want to use for this conversion. I use Darktable, but RawTherapee can also be placed on the first line.

If you have selected a raw thumbnail in gThumb, or the photo is open, then the keystroke G sends the file to Gimp, via Darktable. First Gimp is started, then Darktable and after opening it shows a short message that after closing this program, the converted raw is sent to Gimp.

Please note that these are 32-bit files by default, I find no option in Darktable to indicate that I want 16-bit files. So the first thing I do in Gimp is to downsize this file to 16-bit (via the menu: Image, then Precision).
In Gimp I assigned the shortcut Shift+Ctrl+G to start G'mic. Now I can send a raw file from within gThumb directly to G'mic. For this I click G to start Gimp, Darktable opens now as raw convertor, then Alt+F4 to close Darktable, then Shift+Ctrl+G to further process this file in G'mic. Lightning fast!
Dcraw is probably the oldest raw converter and is used by several programs, including RawTherapee, in modified or unmodified form. This is a terminal program that you can also call from gThumb. The command line is now slightly different, because you have to provide some parameters. If you want to use dcraw, you must first install it from the Software Manager on your system.
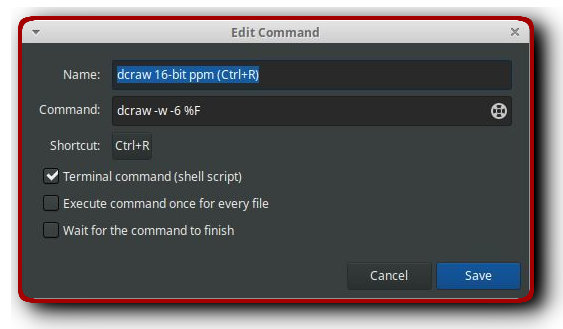
Click again on New Command and enter dcraw as the name. The command line here is the same as when you use dcraw in a terminal. The basic command is dcraw -w %F. The -w option stands for: use white balance camera. If you omit this option, your converted photo will have very wrong colors.
By default, dcraw converts a raw file to a ppm. If you prefer a tiff as a result, add the -T parameter to the above line. If you want a 16-bit file as output, add another -6 to the list of parameters.
As a shortcut I choose Ctrl+R. Place a check mark in front of Terminal and save the command. My command line looks like this.
Select a raw thumbnail in gThumb, or view the photo enlarged, hit Ctrl+R and within a few seconds a 16-bit ppm will be produced . In many cases, it already looks okay. But keep in mind that the converted file still needs to be sharpened, or passed through a noise filter; dcraw only provides a basic conversion.
I have made two other commands for dcraw, using the extra -b parameter (brightness). If a photo converted with dcraw is too bright, or if the highlights are washed out, I lower the -b value somewhat (the default value is 1.0).
The command is:
dcraw -w -6 -b 0.7 %F
To raise the brightness of a photo, I use the value 2.0, like so:
dcraw -w -6 -b 2.0 %F
My complete job list, which appears in my Tools menu, looks like this.
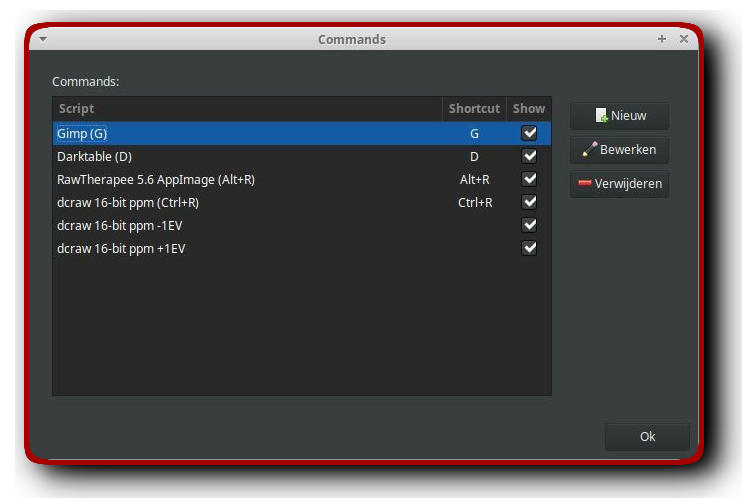
You can drag those commands within the Commands window to reposition them.
_____________
